From Prototype to Production
Scaling a part from a 3D-printed prototype through a vacuum-cast or machined bridge run to injection-molded or die-cast production, and designing for the whole path.
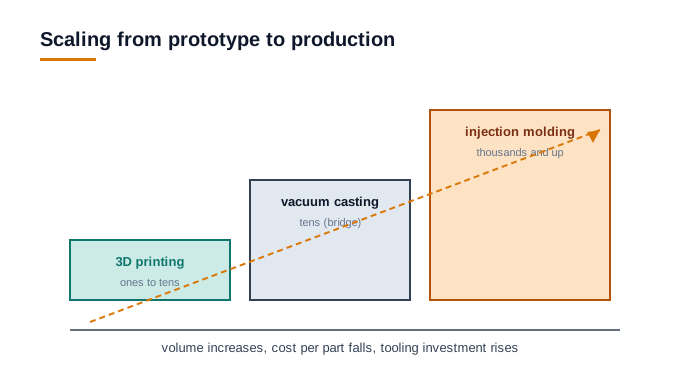
Download PDFA part rarely starts at production volume. It begins as a 3D-printed prototype for form and fit, becomes a vacuum-cast or machined bridge batch of tens of parts to validate function, then ramps to injection-molded or die-cast production once volume justifies a hard tool. Design to the eventual process from the start so the geometry does not have to change.
A part rarely starts life at production volume. It begins as one printed prototype to check form and fit, becomes a small batch to validate function, and, if the product succeeds, ramps to thousands. Each stage has a process that fits it, and designing with the whole path in mind saves a costly redesign later. This guide maps the journey from the first prototype to full production.
The trade-offs draw on the same process capabilities covered in the process-selection and cost guides.
The stages
1. Prototype: 3D printing
The first parts confirm the design: does it fit, does it look right, does the mechanism work. 3D printing turns a model into a part in a day or two with no tooling, so it is where almost every part starts. Use it for form and fit checks and early functional testing, accepting that tolerances and material properties are approximate.
2. Bridge: vacuum casting or CNC
Once the design is close, a small batch, tens of parts, is often needed for testing, a pilot run, or early customers, before committing to a hard tool. Vacuum casting produces up to about 25 realistic cast-plastic parts from a soft silicone mold made off a printed master; CNC machining produces functional metal or plastic parts at the same low volumes with production-grade tolerances. This bridge stage validates the design at low cost while the tooling decision waits.
3. Production: injection molding or die casting
When volume justifies it, a hard steel tool drops the per-part cost far below any no-tooling process. Injection molding for plastics and die casting for metals produce thousands to millions of consistent parts. The tool is a real investment, so it is committed only once the design is proven.
Designing for the whole path
The parts that scale smoothly are designed for their eventual process from the start:
- Design to molding rules early. If the part will end up injection molded, apply uniform walls, draft, and generous radii from the first prototype, so the geometry does not have to change when the tool is cut.
- Keep tolerances realistic. A prototype can be machined to a tolerance the molded production part cannot hold. Design the fit to the production process, not the prototype.
- Match the material. Print or cast in a material that behaves like the production resin or alloy, so test results carry over.
- Plan the volume honestly. Choosing the bridge stage well avoids both buying a tool too early and machining thousands of parts one at a time.
How MASA FabWorks helps
Because the same DFM engine checks a part against every offered process, you can see early whether the geometry that prints cleanly will also mold or cast cleanly at volume, before you commit to a tool. That lets a part move from a printed prototype to a molded production run on the same design, not a redesign at each step. The result is a smooth path from the first part to full production.
Frequently asked questions
- How do I scale a part from prototype to production?
- Start with a 3D-printed prototype for form and fit, move to a vacuum-cast or CNC bridge batch (tens of parts) to validate function at low cost, then commit to injection molding or die casting once volume justifies a hard tool. Design to the production process from the first prototype.
- What is bridge production?
- A bridge run is a small batch, on the order of tens of parts, made before committing to hard tooling. Vacuum casting yields up to about 25 cast-plastic parts from a silicone mold, and CNC produces functional parts at production-grade tolerances, so you can validate the design before buying a tool.
- How do I avoid a redesign when moving to production?
- Apply the production process's rules from the first prototype: uniform walls, draft, and generous radii if it will be molded; realistic tolerances the production process can hold; and a prototype material that behaves like the production resin or alloy, so test results carry over.
Related guides
Ready to check your own design? Upload your files. We measure your model against per-process, per-material rules and send a DFM review before you commit to a quote.